
Digital photos need order. Even though you aren’t physically tripping over the clutter of digital photos like you do box of printed pictures, at the rate we’re taking digital images, they may need just as much maintenance and attention then ever.
I was recently working with a client to get her digital photos organized. She was worried and stressed about being sure she didn’t lose years of family photos. Their memories. She had multiple computers, phones, CD’s and SD cards that she was holding on to because she wanted to be sure she had all the photos accounted for. Previously, she had started loading them on to one computer, then changed plans, and reloaded on to another computer. Creating duplicates, and therefore not wanting to delete any just in case she didn’t have them all. She kept buying more SD cards because she didn’t know what was stored where.
If you can relate to any part of this sweet woman’s story, you may want to keep reading. It’s time for you to have a photo intervention. And you can do it on your own with a simple plan and a dose of patience.
- What you need:
External hard drive or “central hub”
Small stickers
All your electronic devices that store your photos and corresponding USB transfer cords
Card reader [if you have SD cards]
Main Work Computer
First, you need to GATHER everything into one place. Scour your house for old computers, laptops, phones, tablets, SD cards, CDs, and jump drives. Designate a box for them to live in throughout this process. Use a computer as your main station for transferring images. Store the box nearby.
Next, you need to TRANSFER the images to what I am going to call your “Central Hub.” I would recommend your Central Hub to be an external hard drive, but it could be a computer or an internet/cloud based location. This needs to have enough storage space to hold all your digital images. Many external hard drives come in terabytes, which would be more than enough space for the rest of an average person’s life. Determine based on how many photos you think you have.
On the Central Hub create a folder and name it “photos transferred as of [today’s date].” In this folder, create sub folders for each device as you download it. Don’t create them all at once or you’ll start confusing yourself on what you’ve already completed. Take it one device at a time. Create and name the folder “laptop [owner’s name]” or “iPhone 1,” or however you can identify it ongoing. Plug it into your computer using the proper cords and copy all the images from the device into the Central Hub’s designated folder. If you don’t know how to copy and paste, ask your children.
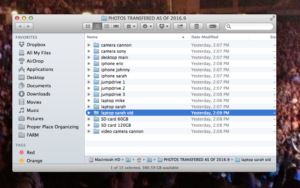
When you are done transferring. Put a sticker on the device indicating it’s been downloaded. This also helps you remember what has been downloaded already and what hasn’t. Repeat this for each device you have, ensuring each has it’s own folder. Don’t get distracted by what photos are in the folders nor look for duplicates, just get them all transferred.
Once they are all transferred in to one place you should take a DEEP BREATH. There may not be an order yet, but at least they are all in one place.
March on.
Now you need to SORT the photos so you can enjoy them. On the Central Hub, create folders by year. Probably starting in 2000ish, or earlier if you have previously scanned pictures in. You can always add folders as needed. Label year.month [2016.9].
Have two finder windows open:
A) with the empty yearly folders and
B) with all the transferred images.
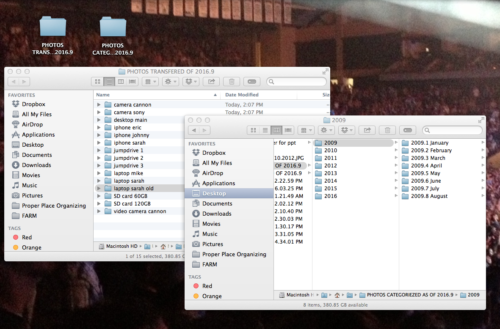
Open one device folder of transferred images and “view/sort” the photos by date. Select images and cut/paste them into the corresponding year folder. Thankfully, most digital devices assign a date to the image when you took the pictures, but sometimes they are off, so be sure to glance at them occasionally to be sure they are accurate. Do one device folder at a time, dragging them into the correct year. Don’t worry about deleting duplicates, yet.
Once all the photos are categorized by year you can create subfolders to sort by month. You can get as detailed as you’d like in each monthly folder, such as grouping and labeling events and occasions. Or you can leave them by month and keep it simple.
If the organization gets to detailed and layered, it’s really hard to maintain ongoing.
I recommend organizing photos by year because it’s the easiest way to find your photos. If you tend to want to categorize by person or event, use tags which are offered in many programs and computers.
You’ll need to remove DUPLICATES. If the images have the same file name, but are stored in two places, the computer will prompt you with a pop-up saying you’re trying to copy the same image twice. That will eliminate some duplicates. Otherwise, when you are done sorting by year, look at the file names and images to determine what needs to be deleted. Usually they stand out in chunks because of events or occasions.
Don’t let all your hard work go to waste. BACK UP your images in two places, such as an external hard drive, cloud based system, your computer, etc. Store them in different locations in case of fire or theft.
Now that you’ve disciplined yourself to do the hard work, you must put quarterly MAINTENANCE on the calendar. If you go longer than 3-6 months, it gets too overwhelming and you’ll spiral back to where you were.
Create a system for maintaining so you don’t get duplicates again. I recommend you keep it simple. You should have minimal devices now, since you removed images off the old devices. So it will be simpler from the beginning.
Maintenance system ideas:
1. Do the same system as listed above–download all devices to one place, then sort onto your Central Hub. If you keep your Central Hub in a hard to access area, such as a safe, you can keep one years’ worth of pictures on your computer so you can access them. But this is why a system is important so you don’t create the issue of duplicates again.
Depending on how much you access photos and trust the internet, another option is:
2. Use a cloud account such as Forever that backs up photos from your computer and phone automatically. Then you just have to go in and sort them into folders as you desire. There are options to tag photos and subcategorize for easy searching and storing. If you don’t trust the world wide web, once a year you can download them all onto an external hard drive. Up to you.
I am an Ambassador for Forever because I like that it takes the thought out of downloading my photos, especially from my iphone.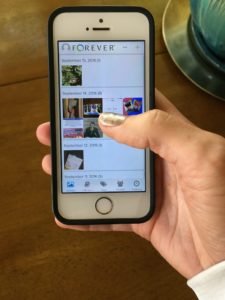
I know that was a vomit of information. It seems complicated, but it really isn’t. The hardest part is the discipline and time management. Set the timer for 25 minutes and work. Slot the time in your calendar so it gets accomplished.
If want advice on organizing your printed photos, read this previous blog post.